
The BuddyBoss integration for AutomatorWP lets you create automations with triggers and actions for BuddyBoss-related events.
The BuddyBoss triggers:
- User account gets activated
- User writes an activity stream message
- User joins any/specific group
- User updates avatar
- User updates cover image
- User updates profile information
- User sends a friendship request
- User accepts a friendship request
- User gets a friendship request accepted
- User sends or replies to a private message
- User replies to an activity stream message
- User favorites an activity stream message
- User gets a favorite on an activity stream message
- User writes an activity stream message in any/specific group
- User creates a group
- User gets accepted in any/specific private group
- User leaves any/specific group
- User invites someone to join any/specific group
- User creates a forum
- User creates a topic in any/specific forum
- User replies to any/specific topic in any/specific forum
- User favorites any/specific topic of any/specific forum
- User gets a favorite in any/specific topic of any/specific forum
The BuddyBoss actions:
- Add user to group
- Remove user from all/specific group
The integration works and requires the BuddyBoss Platform installed and activated on your website.
BuddyBoss Platform is a fork and forge of the BuddyPress plugin and bbPress plugin. Any plugin developed for the BuddyPress and bbPress plugin is supported by the BuddyBoss Platform.
You do NOT need to install the BuddyPress plugin or the bbPress plugin separately. BuddyBoss Platform acts as a replacement for both the plugins.
Installing the integration plugin
To install the AutomatorWP + BuddyBoss Integration:
- Buy and download the BuddyBoss add-on for AutomatorWP from the link below
https://automatorwp.com/add-ons/buddyboss/ - Extract the downloaded automatorwp-buddyboss-integration.zip file to the WordPress plugins folder yourhostname/wordpress/wp-content/plugins OR
Go to your WordPress Dashboard > Plugins > Add New. Click the Upload Plugin button. Browse to the download file location, select the automatorwp-buddyboss-integration.zip & install the plugin. - Click the Activate Plugin button to activate the AutomatorWP – BuddyBoss Integration plugin on your website. OR
To activate the plugin on your website site go to WordPress Dashboard > Plugins and then click the Activate button for AutomatorWP – BuddyBoss Integration. - Go to WordPress Dashboard > AutomatorWP > Licenses, enter the license for the BuddyBoss integration plugin in the BuddyBoss textbox and then click the Save Changes button.
The integration works and requires the BuddyBoss Platform installed and activated on your website.
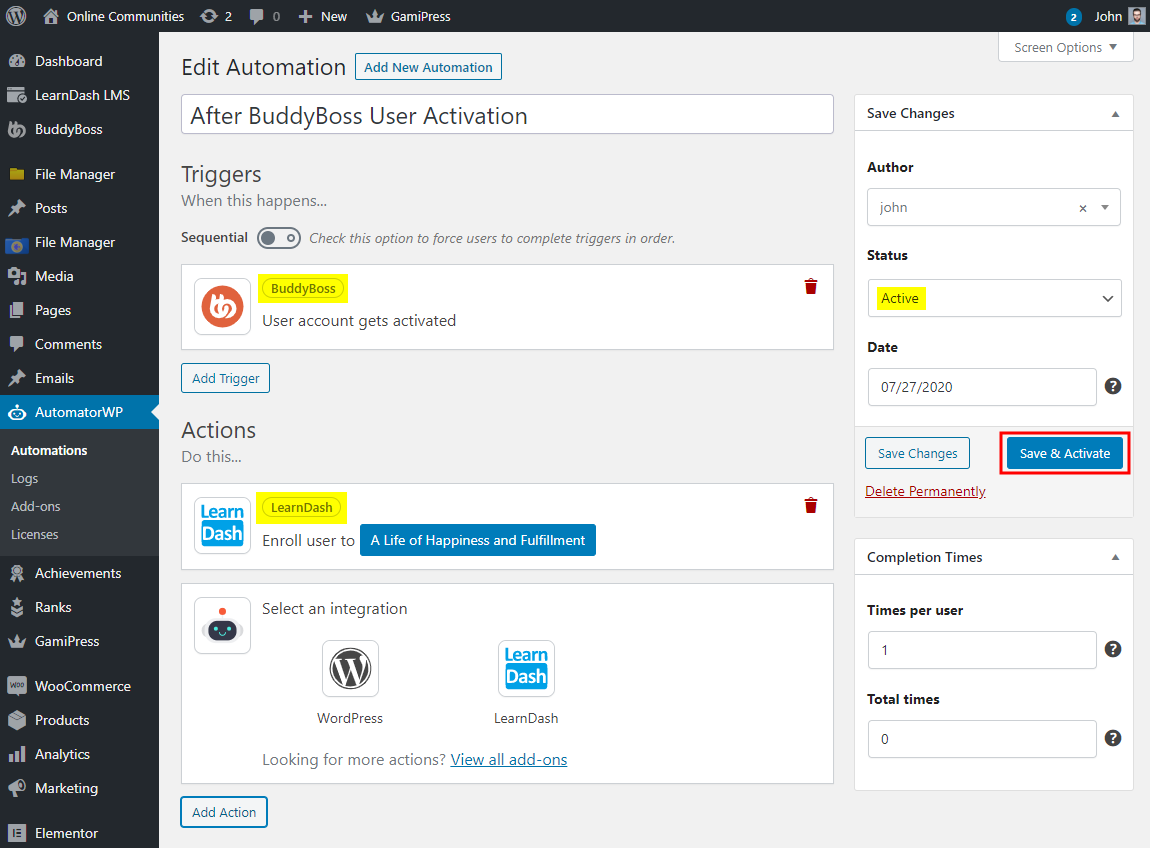
Creating a new automation
Automations are the basic building block of the AutomatorWP WordPress plugin. Every automation has triggers and actions. A trigger is what happens first to tell the site to run an action. An automation effectively tells your WordPress site, “if this happens then do that“. Triggers are the “this” in that example; actions are “that”. To create a new automation for BuddyBoss-related triggers:
- Go to WordPress Dashboard > AutomatorWP > Automations and click the Add New Automation button.
- Enter a title for the automation.
- In the Triggers meta box, click the Add Trigger button and click the BuddyBoss integration and select the trigger for the automation. Click the Save button to save the changes to the trigger.
- In the Actions meta box, click the Add Action button and click the LearnDash integration and select the action for the automation. Click the Save button to save the changes to the action. Optionally, you can set actions for other integrations based on the BuddyBoss-related triggers. For example, enroll the user to a LearnDash course, add them to a group, assign a membership role, etc.
- In the Status meta box, select Active.
- Click the Save and Activate button to publish the automation.
Site administrators can view the automations, trigger and action logs in the WordPress Dashboard via WordPress Dashboard > AutomatorWP > Logs.
For further setup and usage tutorials, refer to the official documentation of AutomatorWP.