
- Obtain your DNS Zone File
There are many Domain Name Registrars with different steps required to obtain your DNS Zone File.
To obtain your DNS zone file from your provider, follow these general steps:
- Log in to your account on the provider’s website or access the management console.
- Navigate to the DNS management section or a similar area where you can manage your domain settings.
- Look for an option or tab specifically related to DNS zone files. It might be labeled as ‘Zone File,’ ‘DNS Zone,’ or ‘Zone Management.’
- Click on the appropriate option to access the zone file settings.
- In this section, you should see a button or link to download or export the DNS zone file. It could be labeled as ‘Download,’ ‘Export,’ or ‘Zone File Export.’
- Click on the download or export option to initiate the process.
- Depending on the provider, you might be prompted to confirm the download or choose a file format for the exported zone file (common formats include BIND or CSV).
- Select the desired format if prompted and proceed with the download.
- The DNS zone file will be saved to your computer or device as a text file.
GoDaddy Example: GoDaddy is one of the most common DNS registrars, here is how you can obtain your file if your DNS is controlled by GoDaddy:
- In the Your GoDaddy account, go to Domain and click Manage DNS. Click on the meatballs menu and
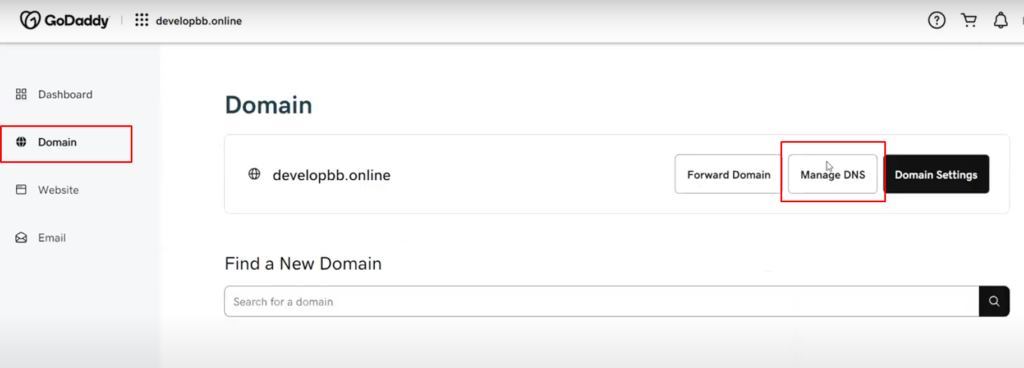
- Click on the meatballs menu and select Export Zone File
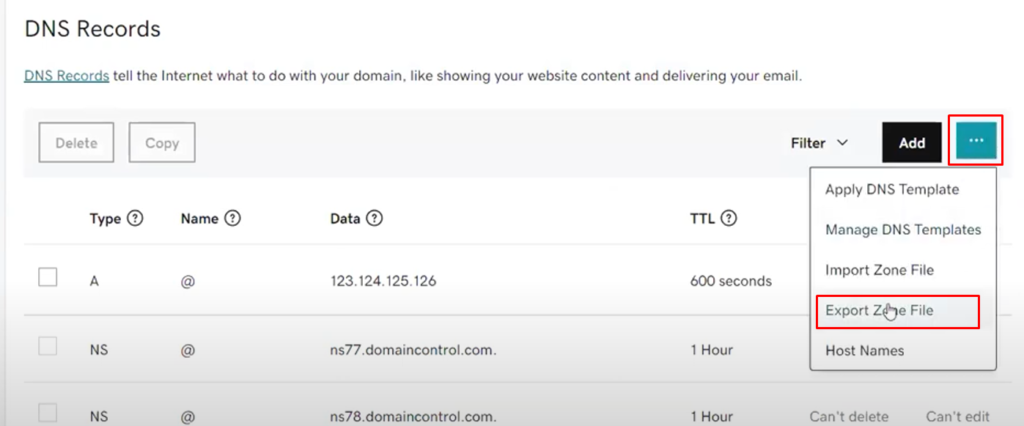
- The zone file will be downloaded as txt file.
- If the client exported it themselves, ask them to upload it to the specific field in the questionnaire and once we have it, refer to the process for Yes under Step#6.
- If we downloaded it for the client, go back to Cloudflare and upload the file there (refer to the process for Yes under Step#6).
It’s important to note that the exact steps may vary depending on your DNS provider’s interface and terminology. If you encounter any difficulties, consult the provider’s documentation or reach out to their support team for further assistance.
- Create a Cloudflare Account + initial setup
- Go to the Sign up page
- Enter your Email and Password.
- Click Create Account.
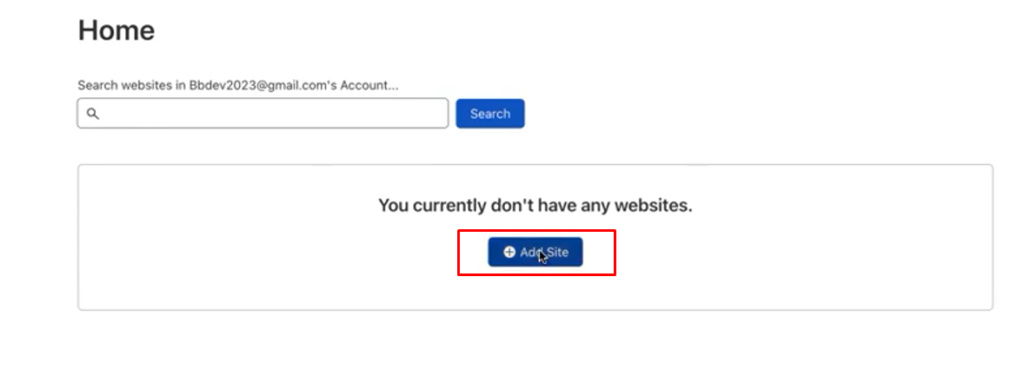
- Login to https://cloudflare.com
- Once you’re in, click the Add Site button
- Enter the domain name and click Add Site. :
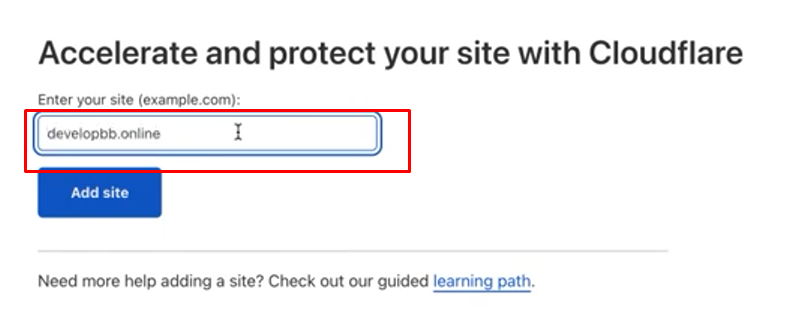
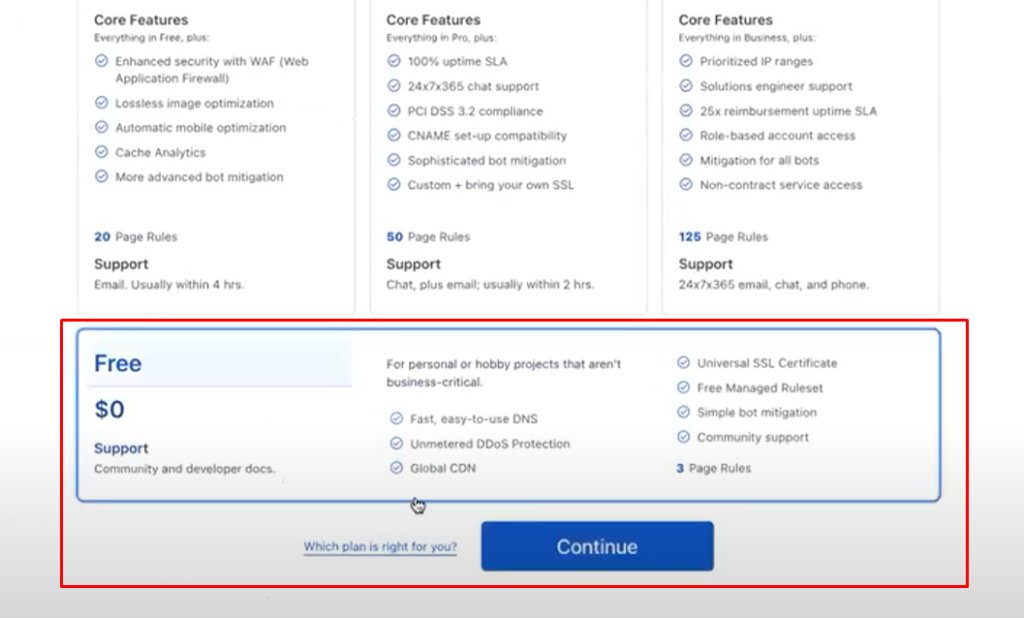
- Choose the Free Option and click Continue
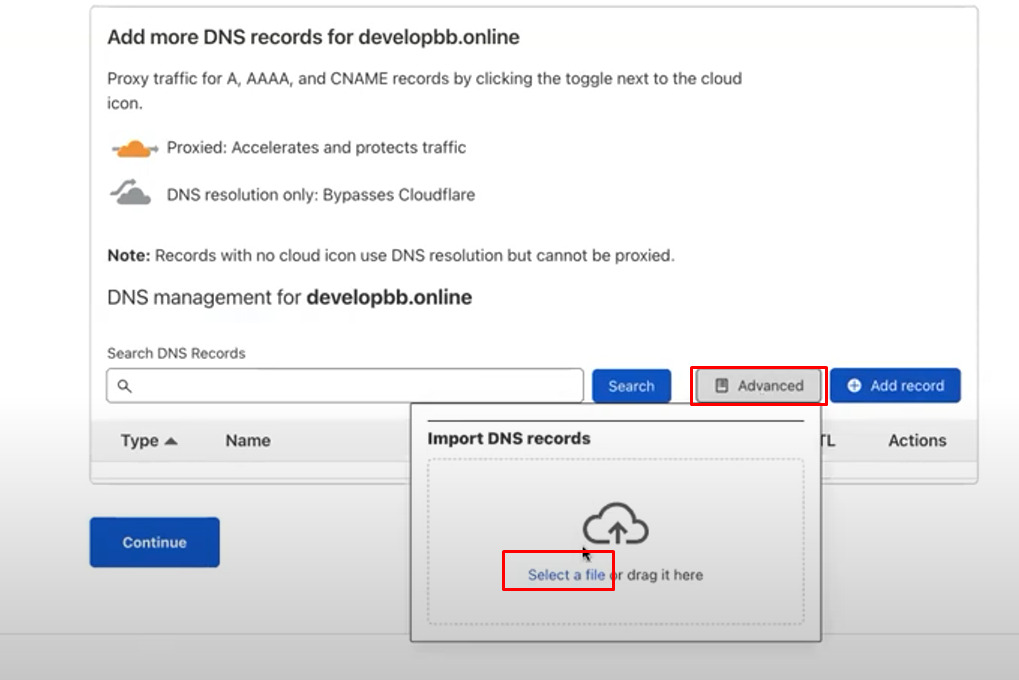
- Upload the DNS Zone file by clicking Advanced and select a file.
Click the Open button once the file is selected and then click Upload..
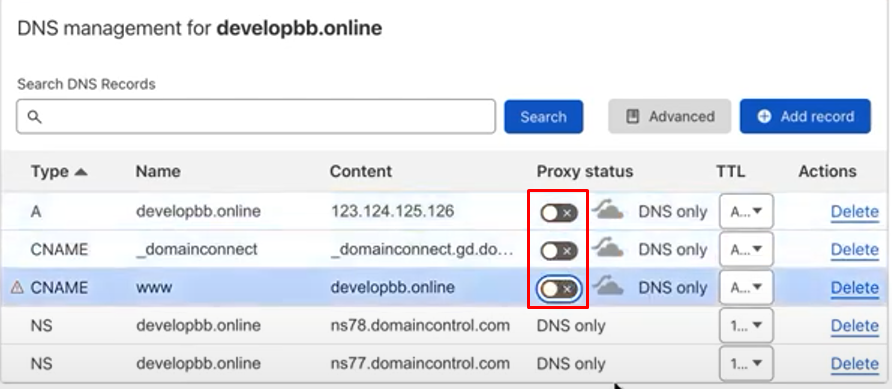
- Once you’ve successfully uploaded the file, you’ll see a bunch of records, toggle off all those that are turned on by default under the Proxy Status column.
- Click the Continue button.
- Copy the Cloudlfare’s nameservers
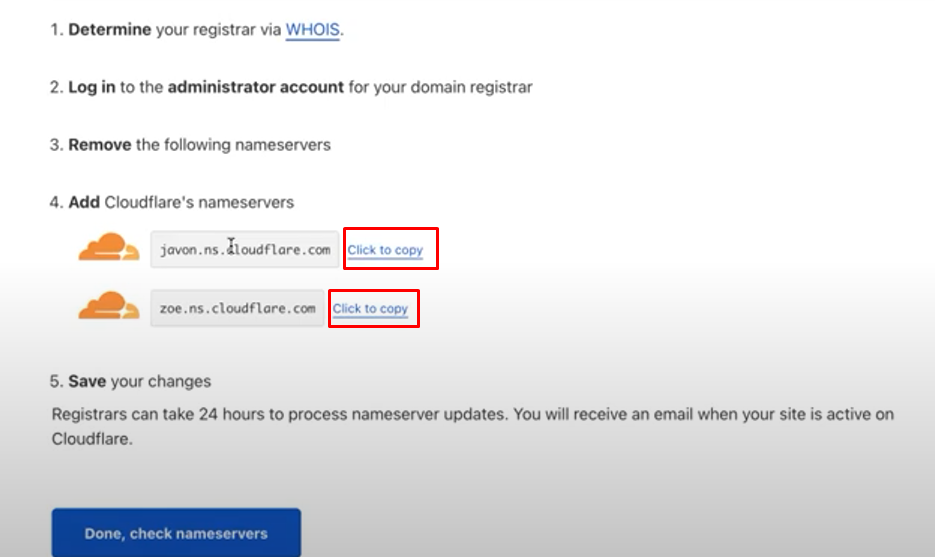
- At this stage, you will need to go back to your DNS Provider (Proceed to #3)
Once you create your account, Cloudflare will automatically send an email to your address to verify that email address.
- Update your Namesevers and IP addresses for your DNS
To update your nameservers and IP addresses in your DNS provider’s admin, please follow these steps:
- Log in to your account on the DNS provider’s website or access the management console.
- Locate the domain or website for which you want to update the nameservers and IP addresses. This might be listed under a section like ‘Domain Management’ or ‘DNS Settings.’
- Select the domain or website to access its specific settings.
- Look for an option labeled ‘Nameservers’ or ‘DNS Management.’ Click on it to proceed.
- In the nameserver settings section, you should see the current nameserver entries.
- To update the nameservers, replace the existing nameserver entries with the new ones provided by your hosting provider or the desired nameservers you wish to use.
- Carefully enter the new nameserver information, ensuring accuracy and proper formatting. Usually, you will need to provide the fully qualified domain names (FQDNs) of the nameservers.
- Save the changes or click on the ‘Update’ or ‘Apply’ button to proceed.
- After updating the nameservers, navigate to the section related to IP addresses or ‘DNS Records.’
- Locate the existing DNS records that reference the old IP addresses you wish to update.
- Modify the IP addresses associated with the respective DNS records to the new ones provided by your hosting provider or the desired IP addresses you want to use.
- Double-check the accuracy of the new IP addresses and ensure they are properly formatted.
- Save the changes or click on the ‘Update’ or ‘Apply’ button to confirm the modifications.
- Depending on the DNS provider, it may take some time for the changes to propagate across the internet. This propagation period can range from a few minutes to several hours.
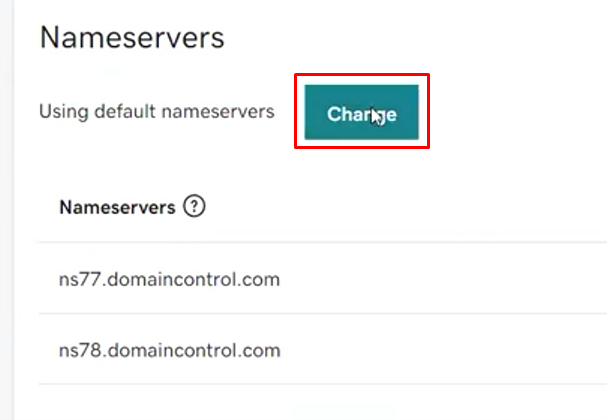
GoDaddy Example:
GoDaddy is one of the most common DNS registrars, here is how you can update your Nameservers if your domain is controlled by GoDaddy:
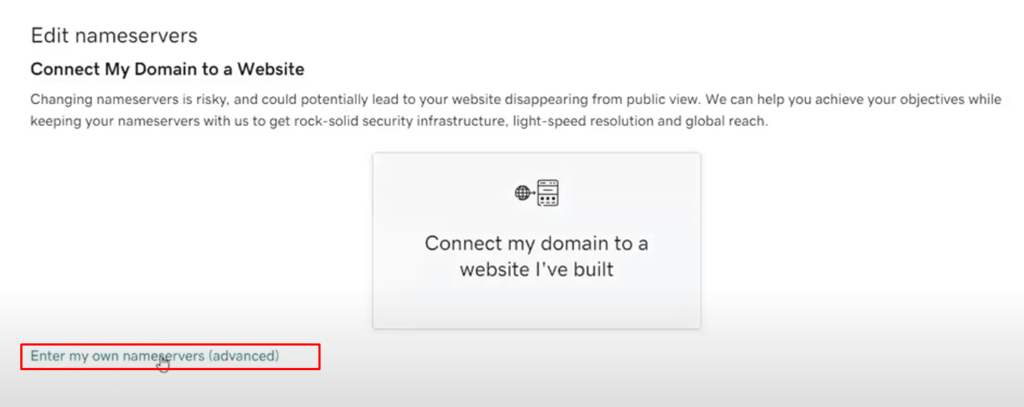
- Under Domain > Manage DNS, scroll down to Nameservers and click the Change button.
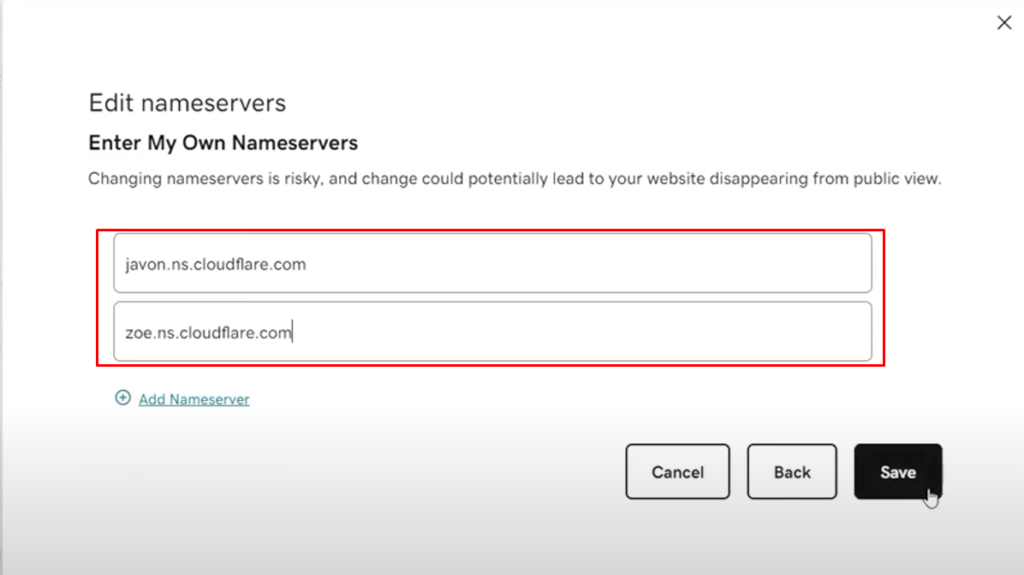
- Click Enter my own nameservers (advanced)
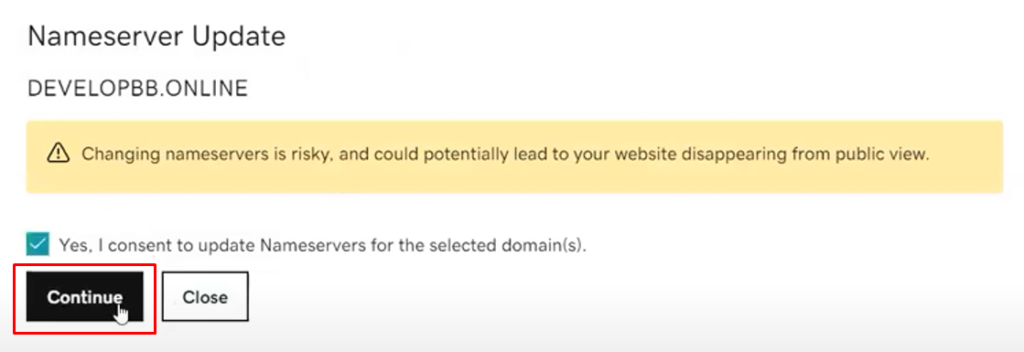
- Enter the links you’ve copied from Cloudways. Click the save button.
- On the pop up that will appear, click the Continue button.
Please note that the exact steps and terminology may vary depending on your DNS provider’s interface. If you encounter any difficulties, consult the provider’s documentation or reach out to their support team for further assistance.
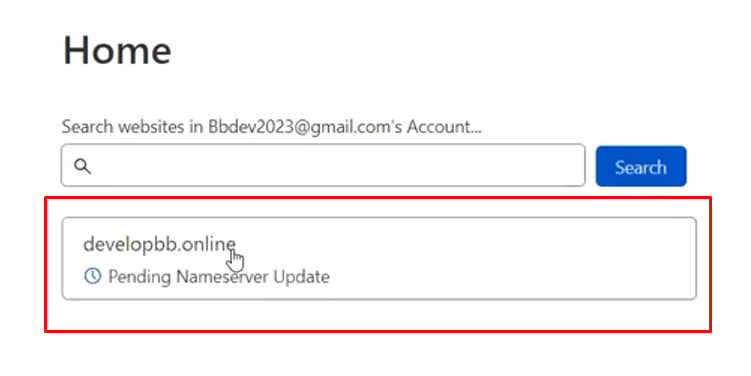
- Check your Nameservers on Cloudflare
- Go Back to Cloudflare, and Login to https://cloudflare.com
- Under Home, click on the site you’ve just added
- Scroll down to “#2 Replace with Cloudflare’s nameservers” and click Checknameservers.
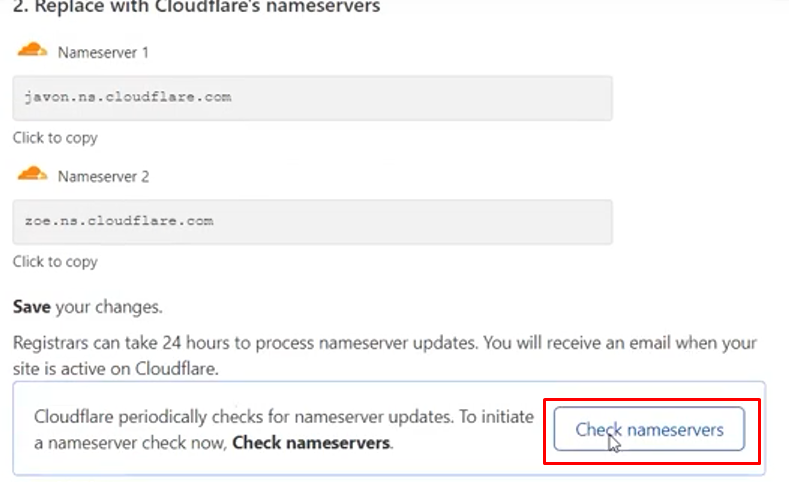
Note: This might probably take time (few hours)
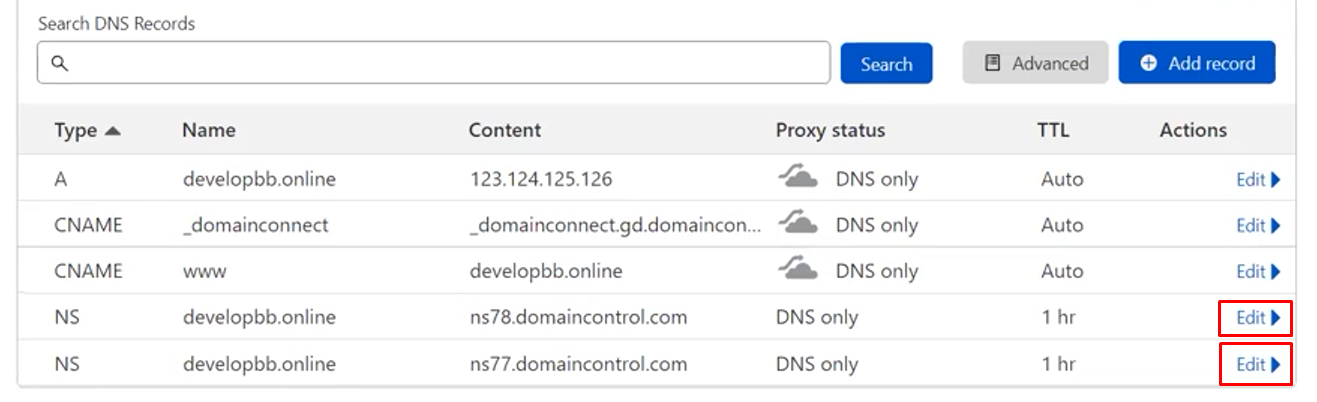
- We can now delete the old nameservers from the list of DNS Records, by doing the following:
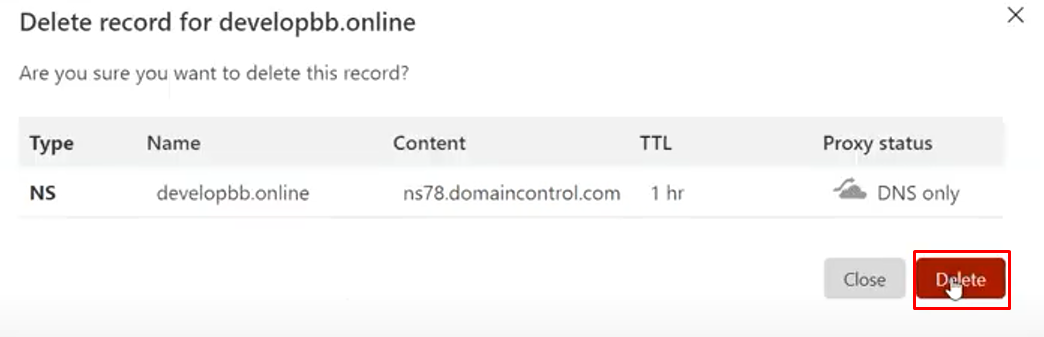
- Click the Edit button under Actions
- Click the Delete button

Note: Do steps a & b for the two (2) old nameservers. - Keep the other records as is.
- Click the Edit button under Actions