Users may be unable to log in to the BuddyBoss App due to several common scenarios—from Jetpack integration quirks to server-level restrictions. This article walks through each issue and provides solutions so you can restore seamless app authentication.
WordPress.com vs Site Credentials
If your site is hosted on WordPress.com or uses the Jetpack plugin, users might attempt to log in with their WordPress.com credentials rather than their actual site account. To fix this:
- In your WordPress dashboard, go to Jetpack > Dashboard, then click Settings (top right).
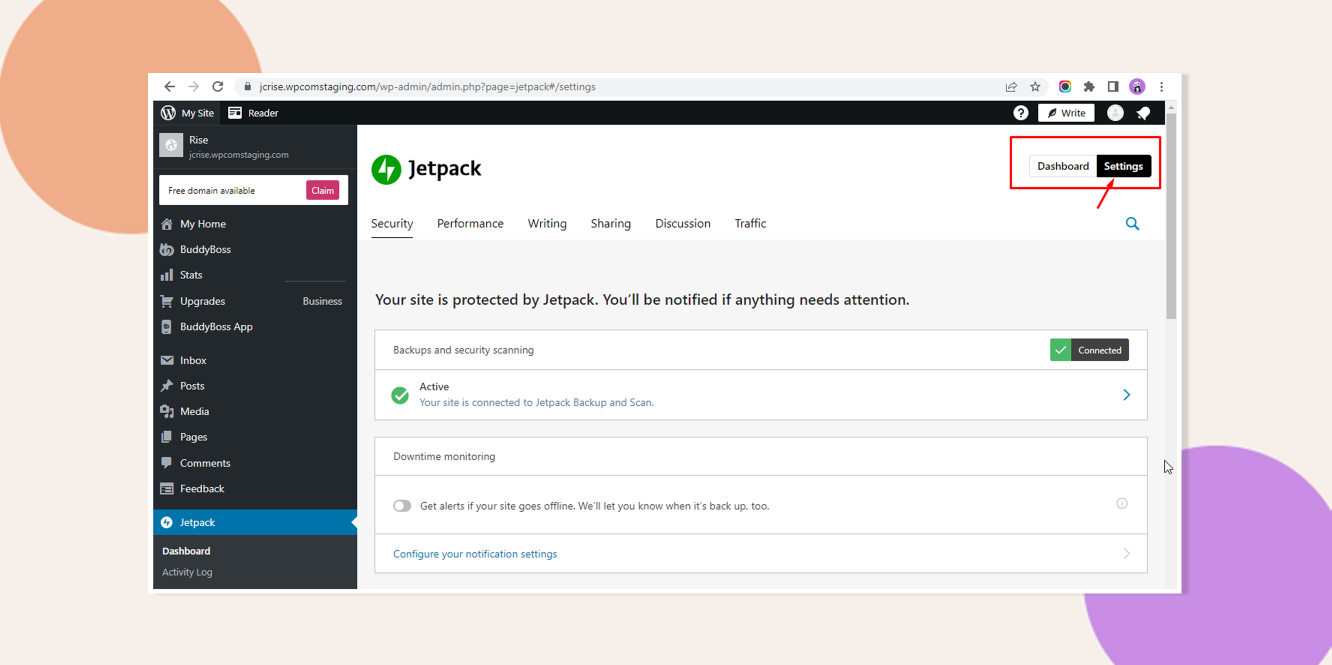
- Under Security, disable Allow users to log in to this site using WordPress.com accounts.

- Have affected users visit the app login screen, which will now redirect to your site’s native login form.
- Users may need to reset their site password to match their app credentials.
Blocked Authentication Endpoints
A “Login failed. Please try again. Error while generating JWT token” message often means your server or a security plugin is blocking the REST API endpoints required by the app.
- Contact your hosting provider and request that these paths be whitelisted:
- /wp-json/*
- /wp-json/buddyboss-app/*
- If you run a security plugin (e.g., Wordfence, Sucuri), temporarily deactivate it and clear all caches.
- If login succeeds, reconfigure your security plugin to allow the BuddyBoss App endpoints, then reactivate and clear caches again.
reCAPTCHA on the Login Page
If you’ve enabled reCAPTCHA for your site’s login form, the BuddyBoss App won’t be able to submit credentials. To resolve:
- Disable reCAPTCHA on the login page or
- Follow the recommended reCAPTCHA setup for the BuddyBoss App.
Troubleshooting and FAQs
Q: I still get a 400 error after whitelisting endpoints—what next?
A: Ask your host to review server logs (e.g., Nginx/Apache or WAF logs) for blocked requests matching /wp-json/* patterns.
Q: Could a caching or CDN layer interfere?
A: Yes. Purge any server-side, plugin, or CDN caches after making changes to endpoint access.
Q: Is this a BuddyBoss or WordPress issue?
A: This is a server or plugin configuration issue affecting the WordPress REST API, which the BuddyBoss App relies on for authentication.
Bonus Guide: How to Set Up X Social Login for BuddyBoss
X Social Login (formerly known as Twitter) allows users to seamlessly log in or register on your BuddyBoss Platform (Web and App) using their X accounts. This guide provides step-by-step instructions as to how you can set up X Social Login for BuddyBoss, enhancing user convenience while simplifying account management.
Explore BuddyBoss Platform | BuddyBoss App | BuddyBoss Pricing | Try BuddyBoss Demo
Tutorial Video
Prerequisites and Key Considerations
App Publishing Requirements
- If you enable Social Login in the BuddyBoss App, both Google and Apple Social Logins are required for publishing on app stores. This is mandatory even if other social providers (e.g., X, Facebook, LinkedIn) are used, ensuring compatibility with device-associated accounts.
- Google and Apple Social Logins are optional only if the BuddyBoss App exclusively uses your company’s account sign-in system.
Required Information for X Social Login
To enable X Social Login, you need the following details:
- Client ID (V2)
- Client Secret (V2)

Creating an X App for Social Login
Follow the steps below to create an X App and obtain the required Client ID and Client Secret for integrating X Social Login with your BuddyBoss Platform.
Access X Developer Portal
- Navigate to the X Developer Portal.
- Log in using your X credentials.
Apply for Developer Account
- If you don’t have a Developer Account:
- Apply for one by filling in all the required details.
- Approval is required before proceeding with the setup.
Create a New Project
- From the Dashboard, click on the + Create Project button.

- In the Project Name tab:
- Enter a name for your project in the text field.
- Click Next.

- In the Use Case tab:
- Select the option that best describes how you intend to use the X Developer Platform.
- Click Next.

- In the Project Description tab:
- Describe your project in the text field.
- Click Next.

After clicking the Next button, your Project will become a sub-page under Projects & Apps page.
Create a New App
- In the App Name tab:
- Enter a name for your app.
- Click Next.

- In the Keys & Tokens tab, you will find:
- API Key
- API Key Secret
- Bearer Token
Obtain Client ID and Client Secret
- Click the App Settings button to complete the setup.

- You will be redirected to Projects & Apps > [Your App Name] > Settings.
- Under User Authentication Settings, click Set Up.

Configure User Authentication Settings
- In the User Authentication Settings page, configure the following sections:
- App Permissions:
- Select Read to grant read-only permissions.
- To access the user's email address, enable Request email from users.
- If enabled, you must also provide Terms of Service and Privacy Policy URLs.
- Type of App:
- Select Web App, Automated App or Bot.
- App Permissions:

- Callback URI / Redirect URL:
- Enter the following URL:
https://yourdomain.com/wp-login.php - Alternatively, navigate to:
- WordPress Dashboard > BuddyBoss Plugin > Settings > General > Registration.
- Click the pencil icon for X.
- Copy the Callback URI / Redirect URL and paste it here.
- Enter the following URL:

- Website URL:
- Enter your website’s URL.
- Click Save to complete the setup.

Obtain OAuth 2.0 Client ID and Client Secret
- After saving, you will be redirected to the page displaying your OAuth 2.0 Client ID and Client Secret.
- Copy the details before clicking Done.

Complete Setup in BuddyBoss Platform
- Go to your WordPress Dashboard.
- Navigate to BuddyBoss Plugin > Settings > General > Registration.
- Click the pen icon next to X Social Login.
- Paste the copied Client ID and Client Secret into the respective fields.
- Click Save Changes.

Verify and Enable X Social Login
- After clicking Save Changes, a pop-up for Login to X will appear.

- Sign in using your X credentials.
- In the X pop-up, click Authorize App.

Once verified, a message will appear: Settings have been verified. Please wait while we redirect you.

- You can now enable the X Social Login checkbox.
- Click Save Settings to finalize.
Explore BuddyBoss Platform | BuddyBoss App | BuddyBoss Pricing | Try BuddyBoss Demo
Troubleshooting and FAQs
Q: Why is the X Social Login not appearing on my site?
A: Ensure Enable Social Login is checked in BuddyBoss Settings. Verify that the Client ID and Client Secret are correctly entered and saved.
Q: Why can't users register using X Social Login?
A: Due to limitations with X’s v2 API, registration using X accounts is not supported. Users can only connect their X account after logging in.
Q: Why is the X Social Login checkbox greyed out?
A: Click the pencil icon next to X Social Login and select Verify Settings to ensure all configurations are correct.
Explore BuddyBoss web and App Pricing at a glance.